PTCL introduces DSL service for our valued subscribers. We are committed to provide you quality internet services. Please follow the installation instructions and log on to your ADSL broadband link.
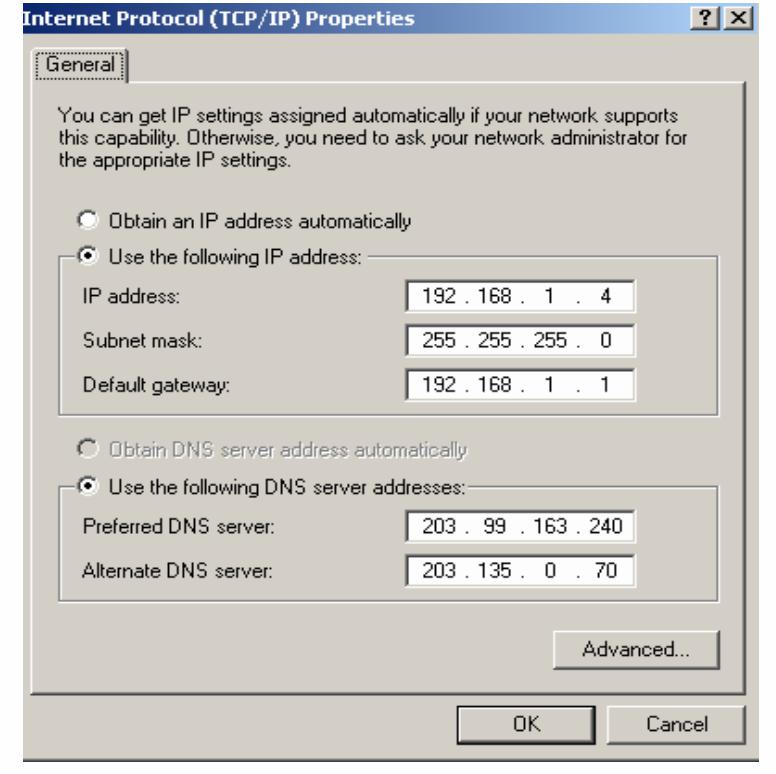
1. Go to Start Menu < Control Panel < Network and Internet Connections < Network Connections. Check that the Local Area Connection is enabled. Right click local Area network and click properties. Following window will be shown.


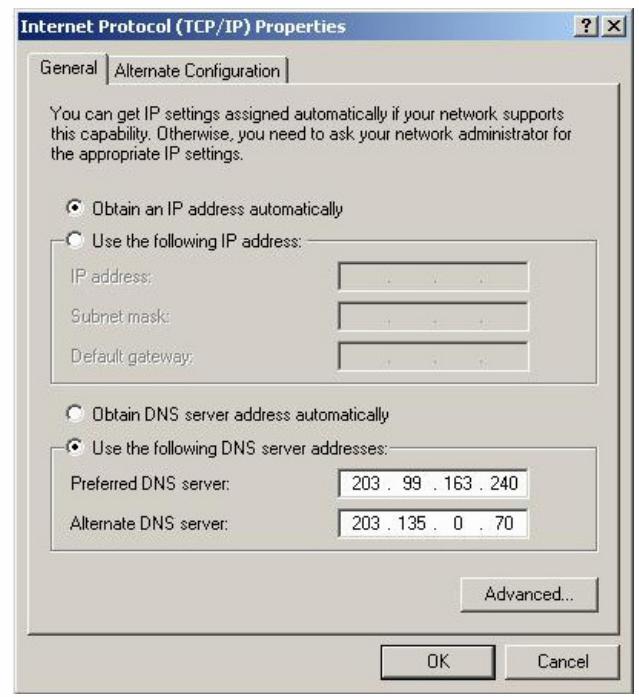
Double click “internet protocol (TCP/IP)”, Check “Use the following IP address” and make the following settings:
IP Address: 192.168.1.3
Subnet Mask: 255.255.255.0
Gateway: 192.168.1.1
Then, check “Use the following DNS server addresses” and make the following settings:
Preferred DNS Server: 203.99.163.240
Alternate DNS Server: 203.135.0.170
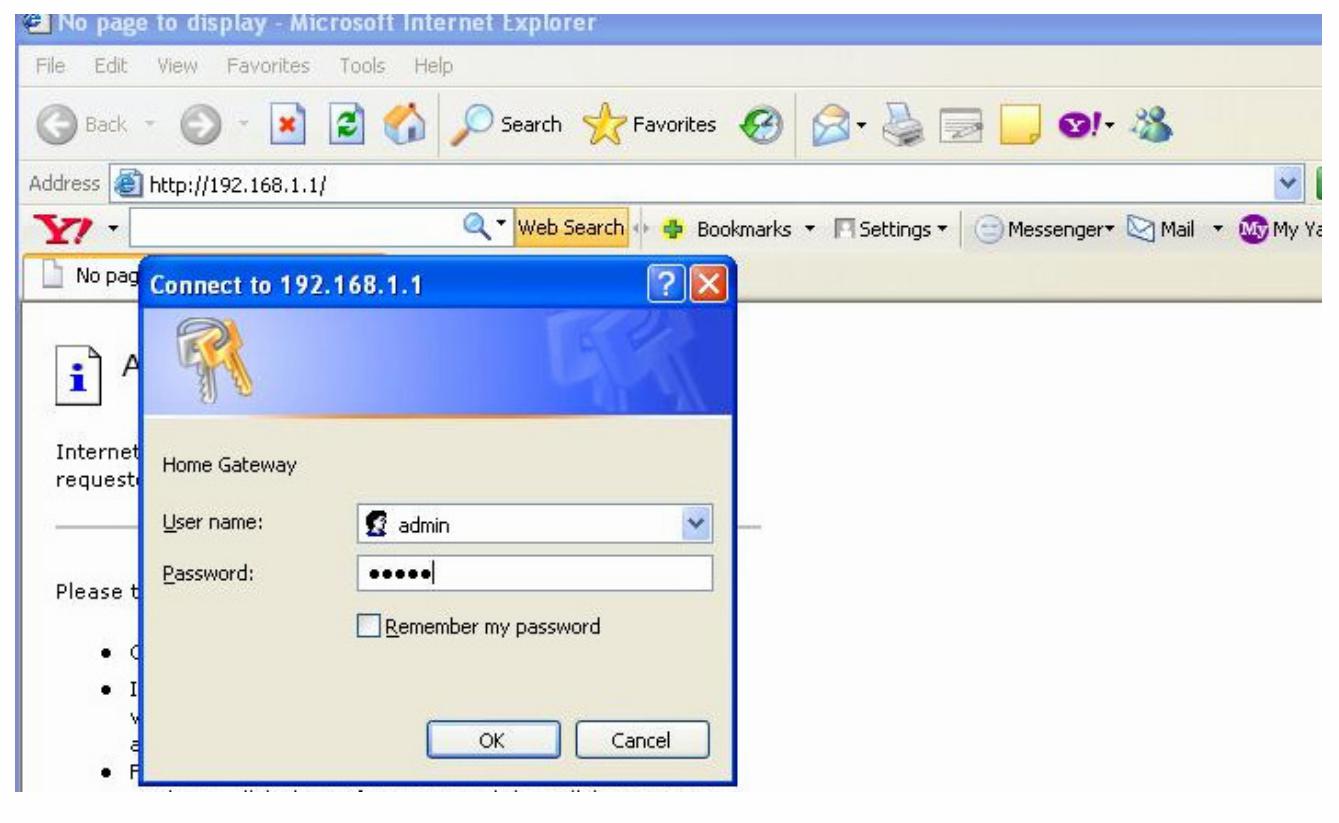
3. Now open Internet Explorer and write “192.168.1.1” in address bar and press enter. There must not be any proxy setting in the internet Explorer.

A small pop up window will open as shown in the figure below and ask ”User Name” and “Password” for opening the CPE’s interface. Enter User Name: “admin” and Password: “admin” and press OK.
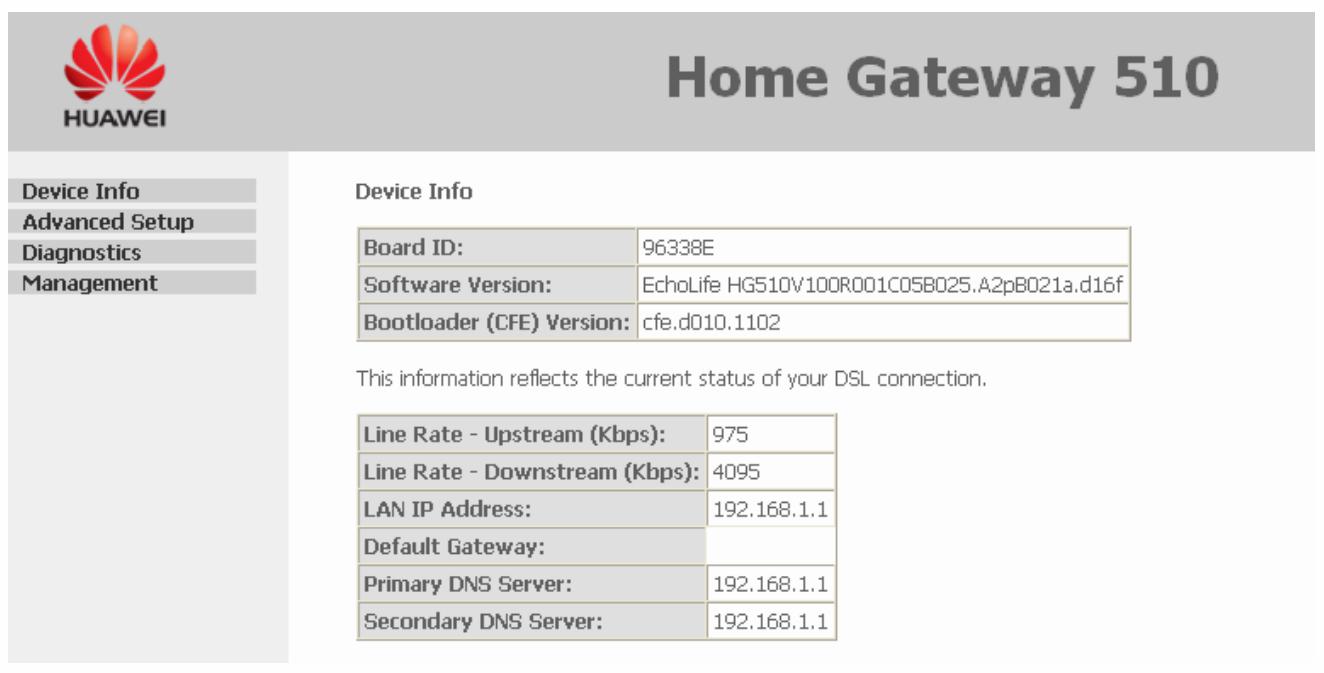
4. Following page will be displayed after entering correct User name and Password:
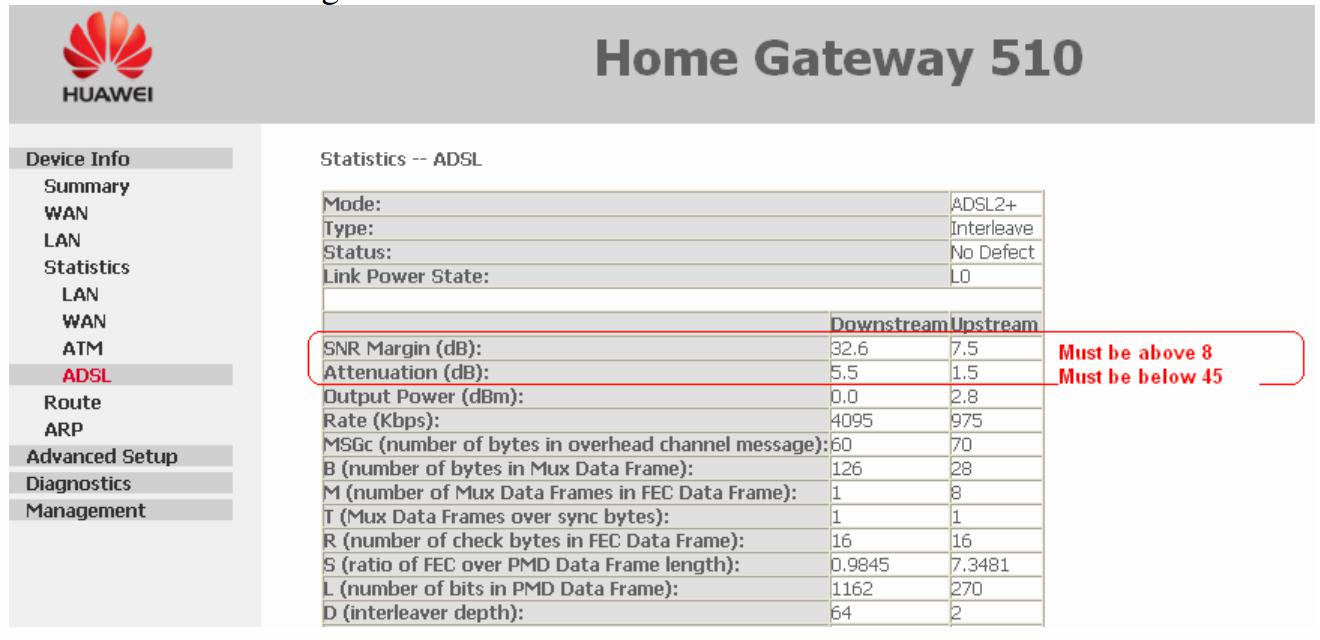
5. Click the Device Info link on the left hand side tabs, more options will be shown. Click Statistics and further more options will be shown, among them select ADSL.


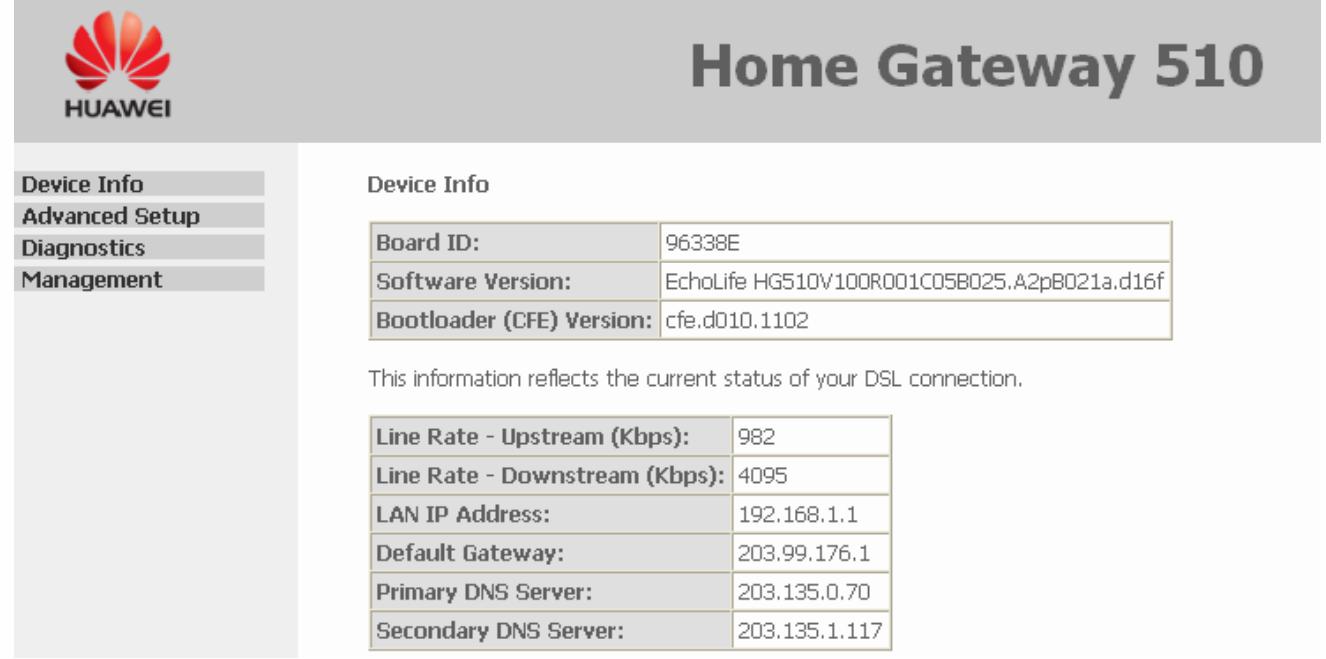
6. Clicking ADSL will show the ADSL line parameters, Note the SNR Margin and Line Attenuation. SNR must be higher than 08 dB and Line Attenuation must be less than 45 dB for establishing a stable DSL connection.
7. Select “Advanced Setup” from the left hand tabs and following window will be displayed.
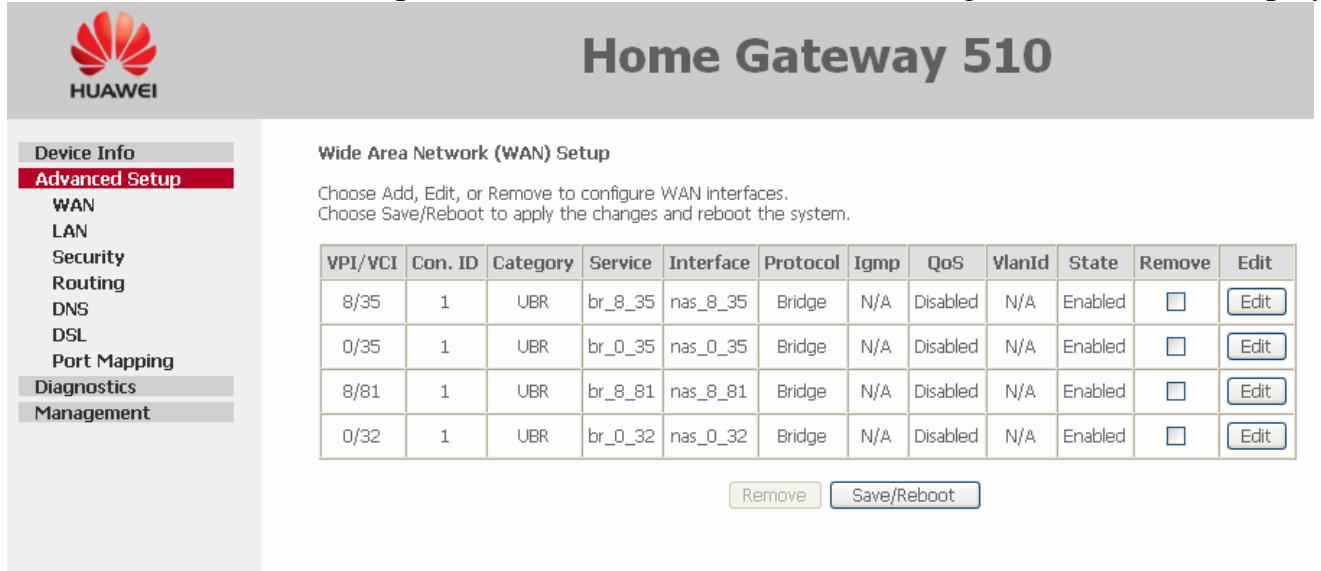
8. “Wide Area Network (WAN) Setup” window is shown displaying the list of default connections. Check all of them except one and click remove button.

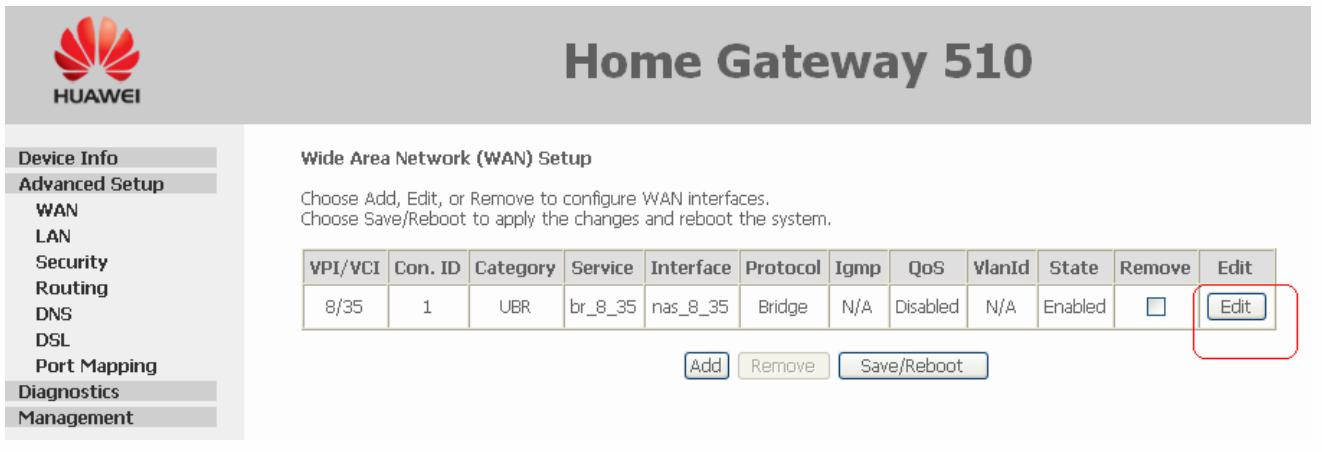
9. Edit the connection by pressing the Edit button.
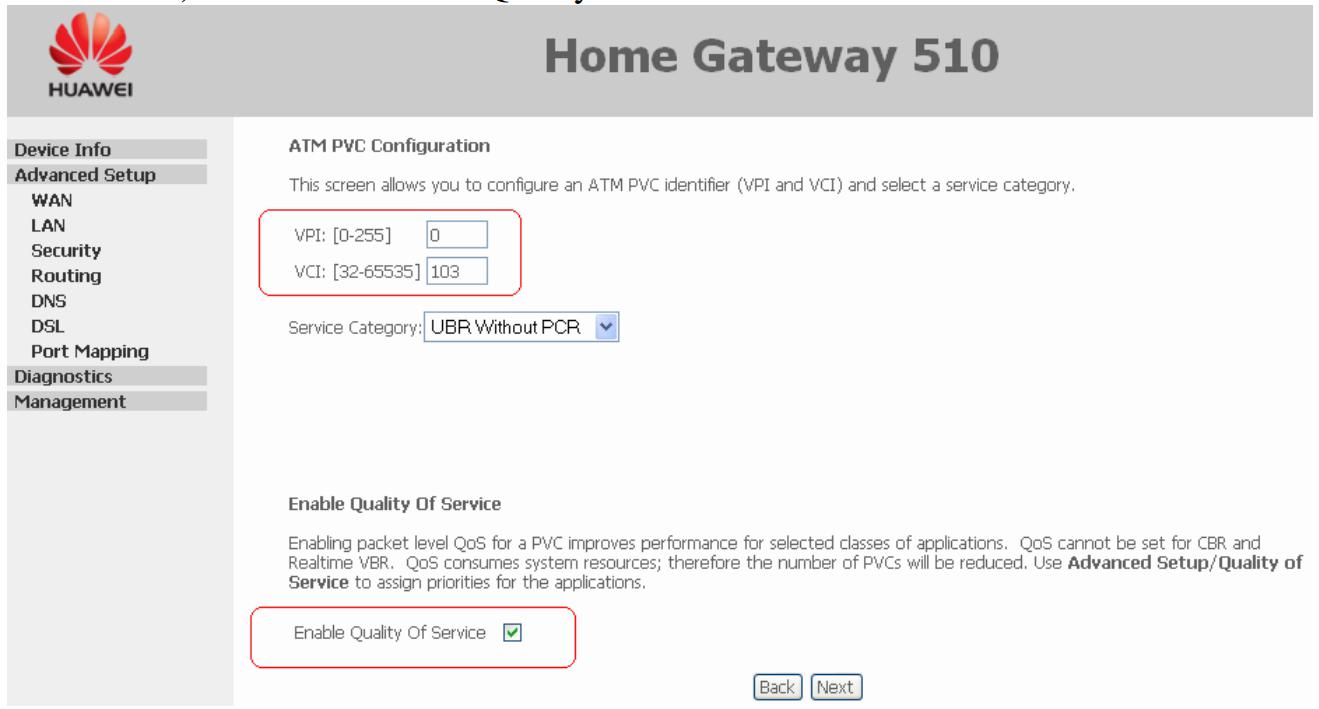
10. Enter the values of VPI = 0 & VCI = 103 for copper (Note: For ONU use VPI=8& VCI=81) and check “Enable Quality of Service” and click Next as shown under.
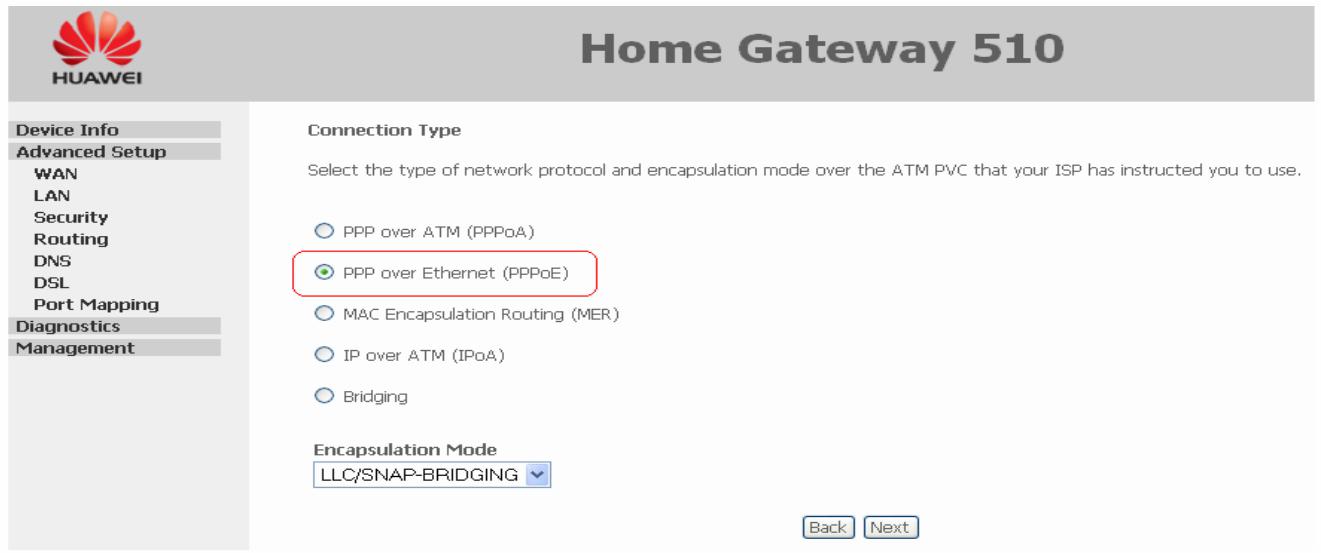
11. Select “PPP over Ethernet PPPoE” and click Next.
12. Enter the Username = 051+telephone No. of subscriber e.g., (0512255678) and Password = New Product No. as provided on External Construction Orders e.g., (1130000xxxx).

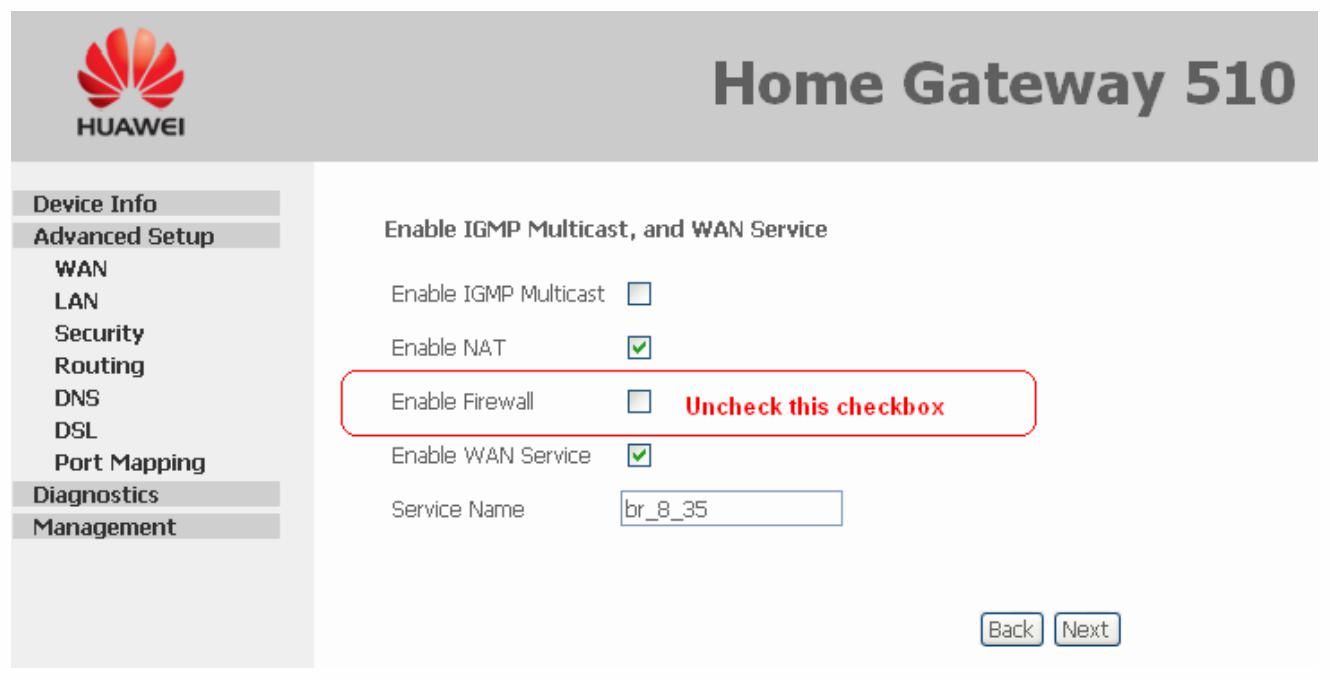
13. Uncheck the “Enable Firewall” checkbox and click Next as shown below.
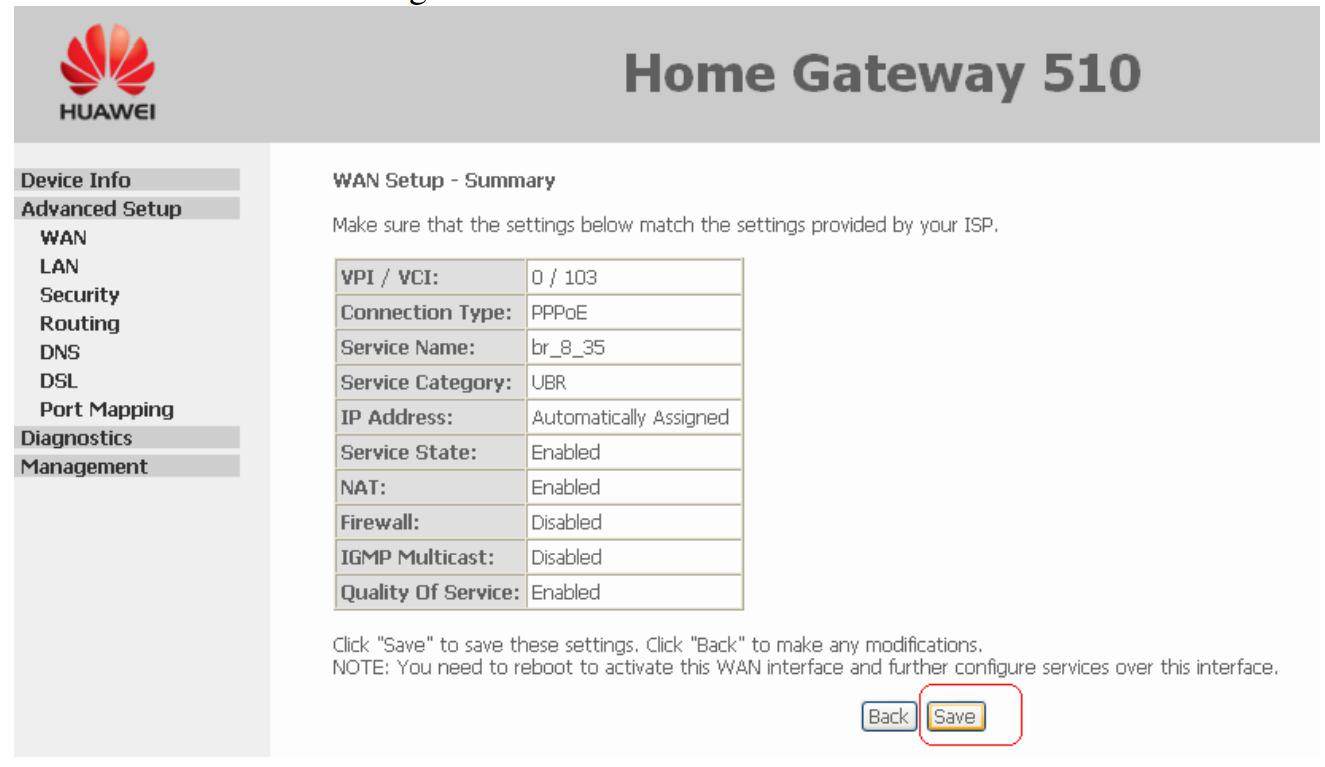
14. “WAN Setup Summary” page is displayed showing the settings/configurations, click Save button to save the configurations.
15. Click Save/Reboot, a message window is shown, click OK to save the changes.


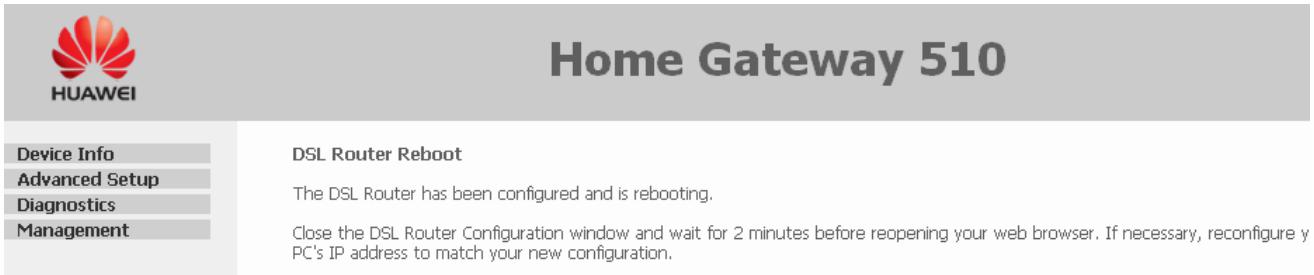
16. DSL Router Reboot window is shown. Wait until the next window is shown displaying the Device Info.
17. Go again to Internet Protocol (TCP/IP) Properties and Select Obtain an IP address automatically and leave the DNS server addresses unchanged as shown in the picture below and press Ok.
Open the Internet Explorer and start browsing the sites for successful configuration and DSL connection establishment.
Step 1: Connecting to the Splitter, Power Connection & LAN cable.
- Line hole connects to PTCL wire or Wall phone Jack (RJ-11 Jack).
- Modem hole connects to the DSL jack of the ADSL CPE (Customer Premises Equipment).
- Phone hole connects to a telephone set.
- Connect the Power Adapter to the AC power plug and attach the connector of adapter to the CPE and switch it on.
- Attach one end of LAN wire (RJ-45) to the LAN interface of CPE and the other end to the LAN wire to the LAN interface of computer’s LAN card.
- Link Indicator lights will lit up and show the connectivity. ADSL light will start blinking and soon will be static as a sign of connectivity with our system, if the line is properly jumpered in PTCL premises with the DSLAM (Digital Subscriber Line Access Multiplexer).Joint less and direct cable line from the nearest PTCL pole or cabinet must be connecting to your splitter and then all the phone extensions must be taken from the phone hole of splitter. The Drop wire distance from PTCL pole or Cabinet must not be ideally more than 50 meters.(Twisted pair wire can be longer)
Step 2: ADSL Configuration in CPE and Computer
1. Go to Start Menu < Control Panel < Network and Internet Connections < Network Connections. Check that the Local Area Connection is enabled. Right click local Area network and click properties. Following window will be shown.
Double click “internet protocol (TCP/IP)”, Check “Use the following IP address” and make the following settings:
IP Address: 192.168.1.3
Subnet Mask: 255.255.255.0
Gateway: 192.168.1.1
Then, check “Use the following DNS server addresses” and make the following settings:
Preferred DNS Server: 203.99.163.240
Alternate DNS Server: 203.135.0.170
3. Now open Internet Explorer and write “192.168.1.1” in address bar and press enter. There must not be any proxy setting in the internet Explorer.
A small pop up window will open as shown in the figure below and ask ”User Name” and “Password” for opening the CPE’s interface. Enter User Name: “admin” and Password: “admin” and press OK.
4. Following page will be displayed after entering correct User name and Password:
5. Click the Device Info link on the left hand side tabs, more options will be shown. Click Statistics and further more options will be shown, among them select ADSL.
6. Clicking ADSL will show the ADSL line parameters, Note the SNR Margin and Line Attenuation. SNR must be higher than 08 dB and Line Attenuation must be less than 45 dB for establishing a stable DSL connection.
7. Select “Advanced Setup” from the left hand tabs and following window will be displayed.
8. “Wide Area Network (WAN) Setup” window is shown displaying the list of default connections. Check all of them except one and click remove button.
9. Edit the connection by pressing the Edit button.
10. Enter the values of VPI = 0 & VCI = 103 for copper (Note: For ONU use VPI=8& VCI=81) and check “Enable Quality of Service” and click Next as shown under.
11. Select “PPP over Ethernet PPPoE” and click Next.
12. Enter the Username = 051+telephone No. of subscriber e.g., (0512255678) and Password = New Product No. as provided on External Construction Orders e.g., (1130000xxxx).
13. Uncheck the “Enable Firewall” checkbox and click Next as shown below.
14. “WAN Setup Summary” page is displayed showing the settings/configurations, click Save button to save the configurations.
15. Click Save/Reboot, a message window is shown, click OK to save the changes.
16. DSL Router Reboot window is shown. Wait until the next window is shown displaying the Device Info.
17. Go again to Internet Protocol (TCP/IP) Properties and Select Obtain an IP address automatically and leave the DNS server addresses unchanged as shown in the picture below and press Ok.
Open the Internet Explorer and start browsing the sites for successful configuration and DSL connection establishment.


Post a Comment